
I’m very thankful for my home. It’s old and drafty, and even a little crooked in a few places- but it’s home. I’m thankful to have these walls to fill with warmth, food and laughter and a place at the table to share with friends and family. I’m blessed to walk past the stairs that need a coat of paint and see the doorframe marked as the kids grow and the stonework we put up ourselves. Truly, I am thankful to call this old place home.
Category Archives: Uncategorized
30 days of thanks: day 9
Thankful that my children are making friends with such sweet, well-behaved, smart and funny kids.
I know there will be plenty of bumps along the way for them as they grow, and I am so glad they have been able to seek out on their own friends that share the same interests and values that they have to learn and grow with.
30 days of thanks: day 3
Today I am thankful for Sunday afternoons spent with good food and family.
We are so lucky to live close to both my and my husband’s parents and siblings- we are able to see everyone frequently and the extended family plays a large part in the daily lives of our kids.
Sundays are often spent in each other’s homes- sharing meals and stories from the week, keeping in touch. I think we are pretty blessed to have this Sunday routine to experience with our girls.
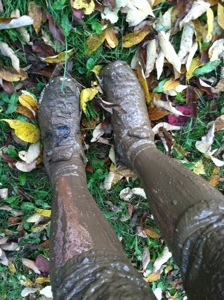
Run for your life- the Muddy Viking 2013

I am not a runner. I can count on my fingers the number of times I have “run” since being under the prison-guard menace of middle school gym teachers. I’ve struggled with weight since I was a kid, and mostly I lose the fight. Fitness just isn’t my “thing” and given the choice of sweating or having a bowl of Death By Chocolate ice cream- I’ve always chosen the ice cream.
So imagine the surprise I met when last winter I announced my intention to join one of the “mud runs” that have been popping up. You? Really? Why??
The reason: turning 40 looms ever closer, and if I don’t change my life now, it literally will never change. I’ve spent 30+ years with one excuse after another why I just “can’t” … can’t excercise, can’t diet, just need a little more time, just need to get through this other project, just need the weather to change…..
Off and on throughout the year I made pretty steady use of the treadmill, with this crazy idea of doing a mud run in my head. The “off” times got more frequent as the summer came- just so many other things to do (ie: excuses not to exercise). My intention to do the run began to lose a lot of steam, until I saw a number of good friends and women I really admire participate in various running events, and all of these fantastic people earnestly encouraged me to go for it. I was terrified as I hit the submit button and paid my entrance fee, but knew the deal was now sealed (see, I don’t part easily with hard earned cash so now I HAD to do it). I can’t say I really trained much more at that point- tried to do a couple miles every few days and put the race out of mind…until yesterday morning: race day!!
The Muddy Viking is a 4 mile off road course with 26 obstacles. I knew going into it I wouldn’t be able to do most of those obstacles (rope climbing? Ha ha ha… Jumping the fire pit! Are you kidding?), but was really truly amazed to find myself actually DOING many of them!! Going down the giant slip and slides was incredibly fun, and I needed that laugh in the face of how HARD the 4 miles was! At the 1/2 way point I was greeted by a wall- and no way around it… Two friendly people on the wall extended their hands and I said “no… I really can’t….” And then over the wall I saw my two children- jumping and cheering for me. I grabbed those hands and went over that wall!! I knew at that moment there was no way I could stop!!
The course was really beautiful – fall leaves through the wooded trails. Running up the creek beds through water, rocks and mud made me thankful for all the times I did that as a kid. Sliding down muddy banks over tree roots – that I can do! I was grateful for the ropes the crew tied to trees to help pull ourselves up the other side of the deep muddy banks! Not able to swim well, I was tempted to skip the obstacle in the lake- but my husband urged me on and I did give it a go… an was thankful to discover the lake water wasn’t very deep when I fell into it. Waist-deep through the swamp, elbow deep in the mud pit… this was insanity!!!! (but really pretty fun!)
This was one of the hardest things I have ever attempted thus far in life- and that moment when I crossed the finish line, drenched in swamp water and mud, exhausted and hurting…greeted by my cheering family- I’ve never been so proud of myself.

I am incredibly grateful to my friends and family who cheered me along, ran the race along with me, and encouraged me to accomplish this goal, your support made all the difference. Tomorrow, I start my first fitness class- the next step in what I hope to be a real, true change. No more excuses.
Sparkly Easter Eggs
Little girls and Easter = sparkly things around here, and this time we are doing glitter eggs to decorate with.
The supplies are basic: eggs, Elmer’s craft glue, water, glitter, paintbrush, some plastic containers or bowls, and some type of stand for the eggs to dry on. We used upside down egg cartons for this.

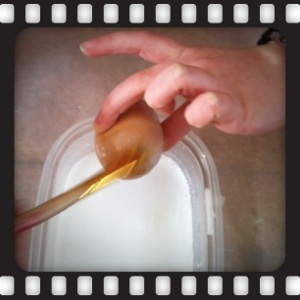
First, you will need to blow out your eggs, which I did over the course of the week. With a very sharp, and very clean, needle (I used a #1 knitting needle) poke a hole into each end of the egg- making the hole at one end slightly larger. You can get fancy and use a baby aspirator, or just good old lung power to force air through the egg and the insides out the larger hole (this is what I did).
Be sure to rinse the empty shells with water and blow out to dry.
In a small bowl mix some Elmer’s craft glue and water to thin the glue. Using a paint brush, coat your eggshell in the glue mix. Then carefully cover by sprinkling with glitter, covering as much surface as possible.

Set aside to dry. We used an upturned egg carton to balance the wet eggs on. Once dry, touch up any bare spots with a spot of the glue mix and more glitter, then let dry again.

Once ours were good and dry with the second coat, I added string to each egg by tying a good size knot onto one end of a thick string (or yarn, or thin twin), then carefully pushing the knotted end through the larger hole of the egg, and tying a loop onto the other end to use for hanging. We hung ours on a “tree” I have on a sideboard in the dining room made from branches spray painted white.

I am really pleased with the finished product of this project, and the kids had a lot of fun with this new way to decorate eggs for Easter.
Have a happy and blessed Easter!
Egg-cellent!

Ten months ago we started our little coop with eleven chicks, and today we finally found ELEVEN eggs!
Just in time for Easter, too. I’ve got a lot of colored eggs and deviled eggs to get cooking.
My, that’s a lovely PURPLE rooster you have there…

First off, let me say WELCOME to those of you who are visiting for the first time today- I am so excited to welcome some new “followers” to the blog! I promise to try and keep it interesting for you 🙂
Isn’t he a “beaut”? That’s Alastor our (now purple) silkie rooster. He had quite a run in with Molly, our biggest Buff Orpington hen last week, and frankly I think he’s lucky to be still be crowing. She’s a bit of a beasty. When I found him he was bleeding pretty badly from his head and comb, so my husband quickly grabbed some Blu Kote spray and well…now we have a purple rooster. I’m wondering how long this color will last? I’ve read that some chicken keepers use a substance called pine tar on injured birds, but I haven’t seen where to buy that yet or know much about it. From what I have read though, the important thing is to cover the location of injury so that the red blood is not visible to the other chickens in the flock to prevent them from pecking at the injury. We saw that happen the first time Alastor tangled with Molly shortly after his arrival this fall. My youngest daughter and I headed out the coop to feed them some salad scraps and found him a with a bleeding gash and the hens all going right after that spot. I had read about it, but was rather shocked to see how brutal they really were about it! My 4-year-old was unruffled by it though. She remembered what I had said about chickens turning cannibal (yes, OF COURSE the kids would remember THAT part about chickens!!!) and started shouting at the hens “DON’T EAT MY DADDY’S CHICKEN YOU CRAZY CHICKENS!!!!!” She was a big help actually with getting him separated from the hens so we could treat him with blue coat and get everything settled down out there. Quite a lesson.

The last couple of days we’ve had a nice break from all the snow, so were able to get in and clear out their pen area and get them all outside during the days, which I think has helped the situation a lot. They seem to be calmer and hassling each other a lot less. I think we’ll all be really happy when spring finally comes this year!
Farm Chick Friday
Wow, where the heck did this week go??
It’s Friday, and time to check out 2 more of the awesome bloggers contributing to Farm Chick Chit Chat! This week I encourage you to visit with Mandie who runs Louise’s County Closet- you can check it out here: http://www.louisescountrycloset.com/
and after you’ve seen all the awesome goodies available through Mandie’s site, be sure to visit with Sonja and all the animals at Lally Brock Farms. Sonja specializes in handmade goat milk soaps and other products- check them out!
http://www.lallybrochfarms.blogspot.com/
Happy Reading!
Farm Chick Fridays
It’s Friday again, and time for another edition of “Farm Chick Fridays”- where I plan to share links to blogs from my fellow contributors to Farm Chick Chit Chat. Each week, FCCC spotlights 1-2 of the bloggers, and I wanted to share them with you here as well. Take a moment to visit with this weeks featured blogs on Farm Chick Chit Chat, they are really great ladies!
Tina is also blogging about her first year of chicken keeping at:
http://ttackanderson.blogspot.com/
Carol blogs about her experiences in homesteading and homeschooling at:
http://everythinghomewithcarol.com/
Happy reading and tell them I sent you over to say “hi”!
-Renee
When in doubt, go with a classic
I would offer my humble opinion that this is good advice for many things in life- whether choosing a book or a recipe or a coat: go with a classic.
Back in college, a good friend of mine commented on how she loved the smell of freshly baked bread because it reminded her of her father, who made the family’s bread every Saturday morning. That image has inspired me for years… and I have a great desire to give that same sort of memory to my kids.
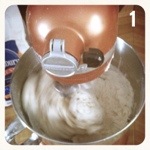 A few years ago, my darling husband bought me a really top-notch dream gift: a Kitchen-Aid mixer. When I saw the bread dough blade that came in the box, that past conversation came to mind and I began trying out recipes to make bread so that I, too, could become the family bread baker.
That was a few years ago.

I’ve tried, really, I have. Somehow, my husband and kids have just never been very satisfied with any of the loafs I have turned out. I have searched the internet and cookbooks, trying out variations on a theme: the basic white loaf. I’ve tested out different flours, differents yeasts. How frustrating to seemingly (honestly, I never found anything wrong with the bread) not be able to bake a decent loaf of bread for my family! I really almost gave up on it until the ladies at Farm Chick Chit Chat decided to do a bread bake-off. That gave me new inspiration to try again. I began searching again for a recipe that would make just a simple, fluffy, moist white loaf…. and I found it. A classic recipe from Julia Child. I should have just started there to begin with. I found the recipe posted on food. com and you can see it here: http://www.food.com/recipe/Julia-Childs-White-Bread-9032
The ingredients are simple:
- 2 1/2 cups water (105-115 F)
- 1 tablespoon active dry yeast
- 1 tablespoon sugar
- 7 cups bread flour or 7 cups all-purpose flour
- 1 tablespoon salt
- 1/4-1/2 cup unsalted butter, softened
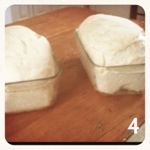
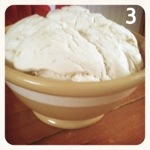
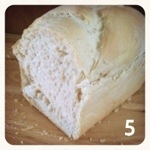
This recipe made 2 really nice, fluffy loaves of basic white bread. I think the butter is what made the difference here, none of the other recipes I have ever made ever called for butter. Also, adding the sugar to the yeast and water to mix and letting it rest was different. Usually, I add the sugar later in the recipe. The final result: a very tasty bread that my family truly LOVED. It sliced nicely for making toast (which we then SMOTHERED in butter and homemade strawberry jam).
I was featured in:

Recommended Reads:
